Wednesday, May 1, 2013

Book for Teacher

Book for Teacher


Give your child's teacher a book about them from their child's point of view for Teacher Appreciation Day.

Supplies:
Construction/Computer Paper
Black Marker
Crayons
Hole Puncher
Ribbon

Take about 4 pieces of computer paper or construction paper and fold them in half, then hole punch.

Draw an apple and thick, block-like letters for your child to color in.


 Think up some questions to ask your child about your teacher. Write the questions with a black marker for them and then have them write the answer and draw a picture to go with their answer in crayon under the question.


Example Questions:
My Teachers Name is:
My favorite thing my teacher has taught me was:
I love my teacher because:
When my teacher is not at school I’m sure she is:
If my teacher wasn’t a teacher then they would be:
If my teacher could have three wishes it would be:
Here is what my teacher looks like:

The finished book:


Popsicle Stick Jewelry Box


Mother's Day is right around the corner and now is a great time to get started making gifts. 

Mother's Day Jewelry Box


Supplies:
Popsicle Sticks
Scissors
Hot glue gun
Crayons
Stickers
String/Ribbon


Cut four popsicle sticks in half to create the corners of the box. 
Put in a strip of hot glue down one of the cut in half pieces of popsicle stick and then lay four whole popsicle sticks on top of the glue. Do this four times.


Put hot glue down each end of the popsicle sticks at the corners and then attach the corners to each other.

 
Make a cover for your treasure box by laying down two popsicle sticks and lining them with hot glue and then placing popsicle sticks long ways on top of the two popsicle sticks with hot glue on them. Leave a little gap between the last popsicle stick and the one before it so that you can use ribbon or string to tie the top on.


Place the lid on top of the box and tie it to the walls of the box with string or ribbon. Insert the string where the slight gap was on the top and then tie it in between the popsicle sticks on one of the side walls. You might need to push the popsicle sticks on the walls back a little to get the string/ribbon in between them.

Then let your child color the popsicle sticks and decorate the box with stickers.


Our finished jewelry box.


Now to make a Macaroni necklace to put into our jewelry box for Grandma. 

Make your own Wrapping Paper

Wrapping Paper

Great for wrapping family gifts. Especially on Mother's Day!

If you shop online you are used to getting these in a majority of the boxes that ship to your house. Instead of throwing them away use them as customizable wrapping paper.

You don't have to wait to get a shipment to get this brown paper though, they also sell this stuff at the dollar stores.

Simply lay out the brown paper, give your child markers, crayons and or stamps and let them freely decorate.


When finished use the decorated brown paper as wrapping paper for a personalized touch on a gift.


May Activities Calendar

Its May! A new activities calendar is here. I am still putting on the finishing touches so frequently check back to see the updates.


To see it all go to the May Activities Calendar page.


Sunday, April 7, 2013

Selling/Donating Clothing

Selling or Donating Clothes

It's time for Spring Cleaning! Clothing that your child has outgrown and no longer needed clothing can be removed for more closet space to make way for spring and summer clothing. The question is how are you going to get rid of all the clothes?

First of all, when cleaning out your closet don't just get rid of clothes because they have long sleeves, you should still keep winter clothing that your child may be able to wear when it starts to get cold again.
Secondly, throw away any clothes that have been through enough play (stained, loose strings, etc.) and have your child try on the clothes and shoes that you are thinking of getting rid of to see if they might still fit.
Thirdly, wash and neatly fold your clothes and shoes in boxes or trash bags until you have figured out what you want to do with them. Keeping clothes in good condition by washing them helps you and/or the charity that you donate to sell your used clothing. No one wants to buy or be given clothing that is wrinkled and worn-looking, be considerate and keep that in mind.


Suggestions for getting rid of Clothes:
- Donate them
- Give them to a friend
- Re-purpose Tagged Items as gifts
- Re-purpose them for yourself or your child
- Store them somewhere cool and dry if you want to keep them for a second child
- Sell them at a Yard Sale
- Sell them In-Store
- Sell them Online


GETTING RID OF CLOTHING THE NON-PROFIT WAY
Donate them
By donating to a charity you can put your old clothing to good use. Making a donation can also be included as a tax write-off so make sure to get a receipt.

Some charities to donate to:
Goodwill
Salvation Army
The American Red Cross
Local Churches
Local Charities in your area


Give them to a friend
Clothing can be expensive and if you want to help out a friend or neighbor who has younger children then help them out by giving them clothing that your child no longer has any use for.


Re-purpose Tagged Items as gifts 
When cleaning out the closet you more than likely always find something that you’ve bought and completely forgot about, it's still cute and wearable with the tag and all still there, but now too small for your child. With these items since they have never been worn and they still have the tags, you can re-purpose this item as a gift for someone else’s child so that they can prosper from your forgetfulness. lol =)


Re-purpose Favorited Items for yourself or child

Sometimes it is hard to let go of an outfit that you love very dearly or has a certain significance to it. For theses items you may choose to re-purpose them to hold on to them longer even though they no longer fit.

Some examples for re-purposing:
Making a pillow case with patches of old shirts
Making a quilt with patches of old clothing
Making a headband with strips of old clothing
Making a bracelet with strips of old clothing
Making bean bags to play with from old clothing


Store them somewhere cool and dry if you want to keep them for a second child 
Like I said before, clothing your child ends up being expensive! So, instead of coming up with a whole new wardrobe give your child the good hand-me-downs and save your older child's clothing. The pro to this other than saving money is that the clothing you have previously bought is completely your taste and fashion sense and we all know that when your child grows out of that outfit you love them being in it is hard to think about getting rid of it.


MAKING A PROFIT FROM USED CLOTHING

The most valuable items are usually clothes that are still new with tags, and name-brand baby clothes. Top end designer brands will re-sell easily such as Ralph Lauren, Gap, Gymboree, and Abercrombie kids. But, even non-brand accessories and clothing can make money, especially if grouped together. Grouping clothing typically sells better online instead of trying to sell individually.

It is important to note that you may not get the exact price you want for clothing that you are trying to sell and that is when you have to come to the decision of letting your clothing go for a lower price or trying another method of selling.


Sell them at a Yard Sale
Yard sales seem to be a little bit more of a hassle since you have to price everything and then haggle with customers but you might actually get a better price out of a yard sale then selling your clothes to a store because you get to choose the price. Make sure to advertise your yard sale with large posted signs directing people to your house. You can even advertise about your yard sale in the paper, on Craigslist, or on websites like yardsalesearch.com


Sell them In-Store 
The good thing about selling your used clothing in-store is that all you have to do is drive to the store, hand over the boxes/bags, collect the money and be done with the entire process. The con to this method is that you might not get what you expect, the store expects to buy clothing from you at a very low price so that they can mark up the cost to make a profit. But, if you are trying to get rid of clothing fast, low hassle and want money right this second then this might be the best option. 


Some stores that will buy your gently used clothing:
Children’s Orchard
Local Consignment shops
Once Upon a Child


Sell them Online  
 Selling or trading clothing online is becoming the new way to get rid of old clothing. You have to keep in mind that more often then not the site you are selling on will take a portion of your profits, charge you a listing fee or buy the clothing from you for a low price before marking it up. Also, think about what your clothing will be worth to a potential buyer so take really good pictures and make sure to describe your product exactly including any areas of wear and tear (hopefully there are no signs or minimal signs of wear) and have patience, your clothing more than likely will not sell over night.

There are also sites that promote trading clothes for clothes. 


Some sites to consider:
Ebay
Make an account and list your item

 
Craigslist.com

For the locals - Put up an ad including pictures, a description of the product and a way to contact you

 
ThredUp.com
Order a bag and fill it with the clothes, send it back to the company and they will pay you for what they can resell.

 
KiddieoMall.com
Register for an account, list your item, upload pictures and a description. When the item sells you pay 6% of the sale to the website.

 
DiddleDumplings.com
 Create an account and sign up for the membership term you want. You pay for the membership fee only and can list as much as you want. Membership fees are as follows: 
Month to Month = $5
 3 Months = $12
One Year = $30


Loobalee.com


Tips for selling online:
  •  Choose the website that best suits your needs
  • Price your item reasonably
  • Take good quality pictures and lots of them
  • Give a very detailed description make sure to include any and all flaws, you want the buyer to be aware of everything, a happy buyer means they would buy from you again and less chance of negative feedback
  • Give the size and measurements of the clothing (various brands of clothing fits ages differently)
  • Make sure you have a way to be contacted (e-mail, phone number, etc.) and respond quickly to any questions or concerns
  • Know how you are going to get the buyer their merchandise and give an estimated shipping date


Wednesday, April 3, 2013

School Day Questions

Getting Your Child to Talk About School


Our children spend a majority of their day at school and unfortunately we can not always be there to make sure they are doing well but what we can do is ask them the right questions to see how their day went.
Our goal as a parent is to not show up at the school and sit through your child's day at class everyday but to always be in the loop regarding your children's experiences and keep an open level of communication with them. We all want to know that our child is well taken care of at school and that they get the attention they need as a student while being able to mix well with their peers. Asking your children questions about their school day is imperative to get a sense of how their day was and keep open that level of communication, and if they get into the routine of talking about their day after school then they will be willing and ready to tell you all about school every time they come home.
Though, if you feel that there is some kind of issue at school involving your child then you should call the school or write notes to the teacher to get an explanation from an adult, set up a parent teach conference or go to the school to sit in on the class for the day.
When we ask our children about their day we don't always get the whole picture since children have a way of being vague and can leave out a lot of details or they might not be able to give you a full account, that can make any parent worry. Also, children don't like to be pestered with tons of questions that they don't want to answer and they definitely don't want to feel like they are being interrogated. Here are some tips and question suggestions to start your child talking without making them feel like they are being drilled:


Tips for asking questions:
- Ask about specific events instead of being broad.
- Ask questions that your child will answer in detail instead of a question that can be answered with a yes or no.
- Ask them right after they are home from school so the memories are still fresh and they get in the routine of telling you about their day every day after school.
- Don't be judgmental about what they tell you, this will make them not want to talk to you, instead just listen and if there is an issue address it with them at a later time in the day so that your child does not associate answering questions with getting in trouble, tattling or causing issues.
- Don't pressure your child into answering a question, if they don't want to answer then they wont, move on to another question. If it is a question you want answered eventually then ask them the question at a later time or try again the next day.
- If you feel like your child is getting tired of questions then give them a break and ask them more at a later time.

Here are some suggestions for asking your child how their day has been:
- What was the most interesting thing you learned?
- How would your teachers say the day went?
- If you could have one class be longer/shorter what would it be?
- What was the nicest thing you did for someone today?
- What was the nicest thing someone did for you today?
- Did anything silly happen at school today?
- Did anything sad happen at school today?
- Who did you play with at recess today?
- What game did you play at recess today?
- What are you looking forward to at school tomorrow?
- Do you like your teacher? How would you feel if you had a completely new teacher tomorrow?
- If you could change anything about the way your day was at school today what would it be?


School Year Keepsake


Things such as pictures, artwork, school work and knowing what your child's favorite past time once was helps keep memories alive. Our kids grow so fast and it seems as though another year passes in a blink of an eye. Preserving the memories of what has happened in a year's time is imperative so you can look back and re-live a precious moment. Even the largest moments that we swear we will never forget seem to loose detail as the years go on, but looking at a picture or an object from that event helps to rekindle that happiness and keeps the memory alive.

The best time to create a Memory Keeper:
At the start of a school year
After a child's birthday

But whichever way you choose, only make a new Memory Keeper at that time next year so that each MK holds a years worth of your child's growth and development. I like to do a new one at the beginning of a school year so that you can keep a year's worth of personal child growth at home and also the development of your child's growth in a certain grade.

Things to put on the cover of your MK:
Your Child's Name
A Current Picture of your child
The Year (ex: 2012-2013)
The School your child is attending/Your child's birthday (depending on when you start the MK)
Your Child's Favorites List (since it will change over the years and its always fun to look back)

Favorites List Examples:
Favorite Color:
TV Show:
Food:
Sport:
Activity:
Best Friend:
Toy:
Season:
Holiday:
Book:
Animal:

Be creative and do whatever you want, I'm just giving suggestions. =)


What to put in your MK:
Pictures
Artwork
Schoolwork
Favorite Toys
Favorite Books
Class Picture

Not only is this a great way to immortalize memories, but; it is also going to be a wonderful experience for your child to browse through their childhood memories when they get older and they will find the MKs priceless.

Paper Coterie is a great website to make a Memory Keeper online. The cool thing about them is that you can add pictures, clip art, text, background, etc., it is completely personalized to your standards. You can look at their products here.
Make sure to check around for any coupon codes that can give you a percentage off or even free shipping. Current codes that you can use are thankyou for 25% off or celebrateparty  for 35% off (there is no given expiration date on these codes).

You can always get a much more affordable Memory Keeper by making your own! Either by putting things in a shoe box for storage and decorating the box or by keeping a binder of your child's progress and decorating the front of the binder. Note that if you decide to do a binder you should get page protectors to put documents in and also it would be nice to have a binder pouch as well to store loose items or handmade toys.
Binder Keepsake Supplies:
Binder
Page Protectors
Binder Pouch


Tuesday, April 2, 2013

Emergency Kits

Emergency kits are a necessity for any mother. But, instead of buying a kit at the store which may not even have everything that you need why not make your own with what you have in the house? Here are some tips for creating your own emergency kit.

First you need a zippered bag or a case to hold all your contents. This should be easy for us women, at one point or another I'm sure you have bought some sort of makeup set that came with a makeup bag, or maybe you have something you ordered online that was sent to you in a case, use that! If you do not then you can always use tupperware to hold the contents of your kit.

What to keep in your Emergency Kit:
Band-aids
Alcohol Swabs
Gauze
Nail Clippers
Tweezers
Antibiotic Ointment (like Neosporin)
Antihistamine Spray (like Benadryl)
Hand Sanitizer
Saline Solution
Ibuprofen
Cash
Flashlight
First Aid Instructions
An Old Cell Phone or an extra cell phone battery for your current cell phone (All phones are capable of dialing 911 even without service as they are charged)
Plastic Baggies (for ice)
Sunscreen
Epi-pen (if there is someone in your family that needs one)
Emergency Contact Numbers (Parents, Grandparents, Family Doctor, Police Dept, Fire Station, Poison Control)

Where should you have an Emergency Kit:
Somewhere easily accessible!

You should already have a medicine cabinet at home that has first aid supplies so the next best place to have an emergency kit is in your car, since we are always on the go. Keep your kit at an easy reach in the glove box.

The above are only suggestions and things that I keep in my own emergency kit. If you need more or less then change the contents to what would best suit you and your family.

Monday, April 1, 2013

Bow Frenzy

One of my favorite creative outlets is to make bows for my little girl. It is a very simple process and you can be as creative as you want. There are tons of cool ribbons out there that you can find for an low cost and the cost of making a hair bow yourself is merely a fraction of the cost that you pay for one if you were to go to a boutique or a store to get one. And the best part is that if you are making your own bow you can customize it and make it as big or small as you want. It really is fun to do. Here are some bows that I have recently made:


 Aubrey loves her bows and has one for almost about every outfit, she has all different sizes and all different patterns. She loves to wear them and I love to make them =)

Sunday, March 31, 2013

April Activites Calendar for Children

Sometimes it's nice to have a plan ahead of the activites you want to do with your children. I have organized a calendar of events so you can plan ahead activites and keep your child engaged in fun games and learning activites over Spring Break as well as the rest of the month of April. Enjoy! 

April Activities Calendar

To go to the page that explains how to do all of the activities for the month click on this link to go to April Activities for Kids!


Easter Side Dish

Happy Easter!


I hope everyone is having a wonderful Easter so far and I'm sure many of you are spending the day with the family. I am preparing for an Easter get-together with the family and am in need of a quick and very easy side dish to prepare so I can spend more of my time getting ready. I don't have much since I am in need of a grocery shopping trip but I do have a generic store bought box of mac and cheese. After quickly raiding my kitchen cabinets and fridge I found some food supplies to throw together with my store brand mac and cheese to make a spruced up nearly homemade dish.


Cheez-it baked Mac and Cheese
 
Ingredients:
Any type of boxed Mac and Cheese (I have Publix brand)
1/3 box of Cheez-its (flavor of your choice. I happen to have Baby Swiss since its my favorite but a lot of people seem to like Cheddar as well-get creative and mix flavors if you'd like)
1 cp Milk
4 tbsp Butter and an addition tsp or so of butter to coat the casserole dish for non-sticking
1/4 cp All-Purpose Flour
Black Pepper
1 cp Cheddar cheese
 
Cooking Instruments:
1 small pot
1 large pot
Mixing Utensil
Strainer
Casserole Dish 

1. Boil the noodles from the boxed mac and cheese according to packaged directions in a large pot, normally for 8-10 minutes. Use butter or PAM spray to coat the bottom of the casserole dish while the noodles are boiling. After the noodles have reached their desired tenderness drain and then place into the casserole dish.

2. In a small pot over low heat melt the 4 tbsp of butter, mix in flour and then increase the heat to medium, add in the milk stir frequently, add the cheddar cheese and cheese sauce from inside the store brand mac and cheese box and heat until partially or fully melted into the mix. Sprinkle pepper to taste into the mix. Pour mixture over noodles in the casserole dish.

3. Place about 1/3 of the box of Cheez-its into a ziplock back and crush into whatever size pieces you desire (I just used my hands and squeezed the bag a lot creating various sizes). Spread the crushed Cheez-its on top of your mac and cheese.

4. Bake uncovered at 375 degrees for 25 minutes.

Now I can focus on getting ready and when my oven timer beeps all I will have to do is just cover my casserole dish and take it with me for everyone to enjoy!
This recipe does not take very long especially if you pre-heat the oven while boiling your noodles.
 
Let me know if you have any other tips and tricks for sprucing up a box of mac and cheese or if you have any tips to make this recipe taste better!

Wednesday, March 27, 2013

Groupon & Living Social 3/27/13

I am a huge fan of daily deal sites such as Groupon and LivingSocial. I prefer Groupon over the two and constantly check the site to see if there is anything there that I simply can't pass up. A couple of good deals have caught my eye today.

1. Personalized Disney Storybooks $24.99- Comes with 3 (choose whether you want books for a boy or girl)


-- Free Shipping is included in this purchase.

-- Once you purchase the groupon you will receive a code to use on the seller's website, you still have to go to the seller's website because you have to enter specific info such as child's name, birthday, some of the name's of your child's friends, etc.

I have previously bought the same Princess books for my daughter as a gift and she loved them. She was able to be a part of the story and we read it over and over since she got such a kick out of it.


2. Leather Ottoman $98.99


--Ultimately the price is $121.96 since shipping and handling is not included. (I know this since I did end up purchasing the item.)

--As soon as you purchase the item and put in your shipping address the process of buying is done, you do not have to travel to any other sites or use any codes to get this product.

--It is 50" long, its made of leather and it opens up for storage.

This deal is a little pricey but for the item that you are getting it is hard to pass up...for me anyway. This will go perfectly as an end of the bed bench which I have always wanted and the tufted leather on top looks great! But for some reason if I am unhappy with it when I get it there is always the free return option.

Check out the above deals for yourself at Groupon.com


-----------------------


1. Personalization Mall pay $15 and get a $30 gift certificate


--And if you use the code BESTOF at checkout you will get an addition $5 off your purchase (this only works for purchases over $15)...so really you would be paying $10 for $30 dollars worth of products at PersonalizationMall.com

--shipping is not included and it is calculated based on what you purchase.


--you will recieve a code after purchasing this to use on their website so that you can select from a huge variety of products on their site and customize them!


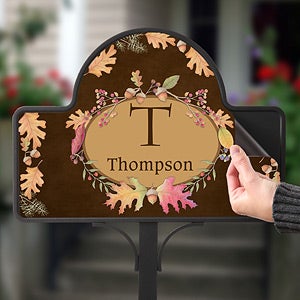
I've bought products from this site before and have been very please with them. I've purchased customized garden stakes/garden stake plates, ornaments for Christmas, Halloween items, etc. It seems to be a great place to find holiday and garden items. I keep the garden stake up year round and change the picture on it periodically, it does well in any weather conditions and gives the year a nice little something to display.

I don't have any pictures of my garden stake to upload but here is an example from Personalization Mall's own website:
As you can see the picture on the stake can be changed as desired because it is magnetized. The magnetic bond between the picture and plate is very strong and you will not worry about it coming off...but when you are ready to take it off yourself it will easy come off just like a magnet on the fridge.

Check this deal out for yourself at LivingSocial.com


----------------------------

Happy Shopping!